How to Use Uniswap: Swap, Send, and Buy Crypto

Are you new to crypto and already tired of jumping through hoops just to make a simple trade? Centralized exchanges want your email, your ID, and sometimes even your blood type, only to hit you with high fees and slow withdrawals.
It’s a headache. And for beginners, it’s enough to make you wonder: Isn’t crypto supposed to be about freedom?
If you’re looking to trade cryptocurrencies without depending on a centralized exchange, Uniswap is one of the best choices available. As the largest decentralized exchange (DEX) on the Ethereum blockchain, Uniswap allows users to swap, send, buy crypto, and even trade NFTs without intermediaries.
Of course, diving into decentralized exchanges can sound intimidating at first. Do I need to code? What if I click the wrong button and vaporize my ETH? Don’t worry. You don’t need to be a blockchain expert to use Uniswap. Once you know the basics, it’s surprisingly straightforward.
This guide explains how to start Uniswap in 2025, even if you’ve never used a DEX. You’ll walk away knowing how to use it safely, avoid common mistakes, and enjoy the process. So, without further ado, let’s dive in!
Set Up Your Wallet Before You Connect to Uniswap
Before using Uniswap, you’ll need a crypto wallet that supports Ethereum-based assets (ERC-20 tokens). Here’s how to set it up without breaking a sweat:
Step 1. Choose a Wallet
For beginners, these are the most user-friendly and Uniswap-compatible options:
- MetaMask – Chrome extension and mobile app (Android/iOS);
- Uniswap Wallet – Official wallet with native support (iOS, Android, Chrome);
- Coinbase Wallet – Separate from the Coinbase exchange, mobile app and extension;
- Brave Wallet – Built directly into the Brave browser;
- Phantom Wallet – Originally for Solana, it also supports Ethereum and Polygon;
- WalletConnect – Works with dozens of mobile wallets.
Further in the article, we’ll use MetaMask as an example since it’s widely used and beginner-friendly, but the procedures are similar on all wallets mentioned.
Step 2. Install the Wallet App or Extension
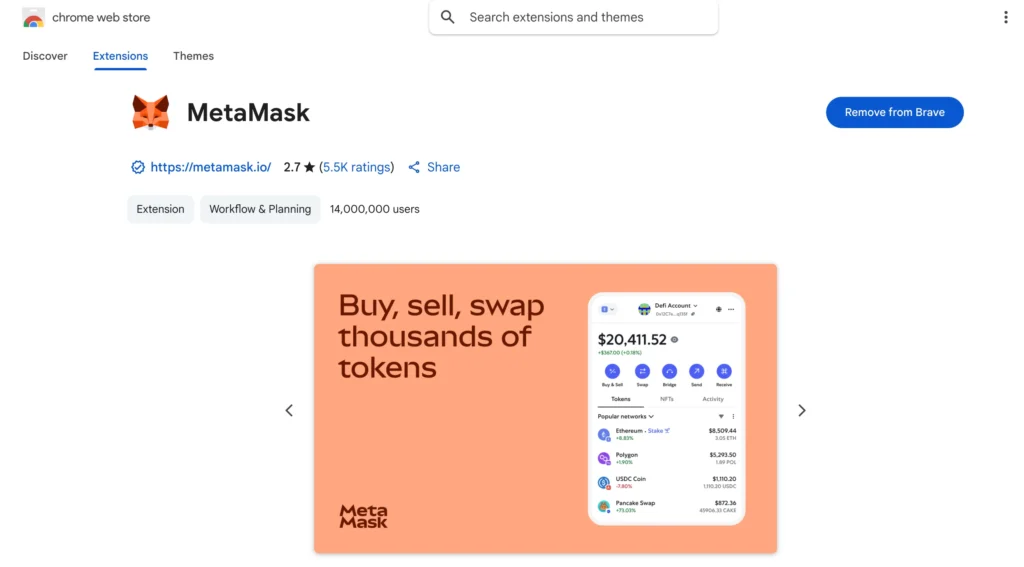
If you’re going with MetaMask:
- Install the MetaMask browser extension on the desktop (it is available for Chrome, Firefox, Brave, and Edge).
- Download the MetaMask app from the App Store or Google Play on mobile.
Ensure you download only from official sources (like the official MetaMask website), not sketchy links or Telegram “recommendations.”
Step 3. Create Your Wallet

Open the MetaMask app or extension and click “Create a Wallet.” You’ll be asked to:
- Set a strong password (you’ll need this to unlock your wallet on the device);
- Secure your secret recovery phrase (12 random words that back up your wallet).
It is important to write down your recovery phrase and store it offline as a safety measure. Don’t screenshot it or email it to yourself. If you lose it, your crypto is gone for good.
Step 4. Fund Your Wallet
Now that your wallet’s ready, it needs some ETH (Ethereum) to function on Uniswap. ETH covers gas fees for every transaction.
You can:
- Buy ETH directly inside MetaMask (using a card, bank transfer, or PayPal, depending on your region);
- Transfer ETH from another wallet or exchange.
Even a small amount is enough to get started. Once your wallet is set up and funded, connect it to Uniswap and start swapping.
How to Connect Your Crypto Wallet to Uniswap
Step 1. Open the Official Uniswap Website or App and Hit “Connect”
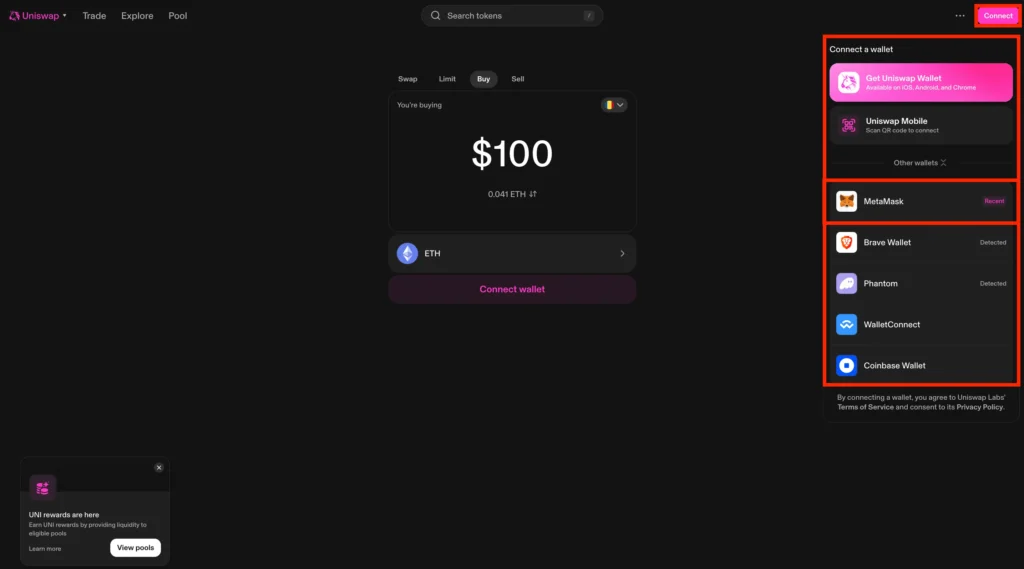
Head over to uniswap.org (double-check the URL).
Click “Launch App” in the top-right corner. This opens the Uniswap trading interface in a new tab.
Once you’re in, tap the “Connect” button (also at the top right). A list of supported wallets will pop up. Choose MetaMask to continue.
Step 2. Approve the Connection in MetaMask
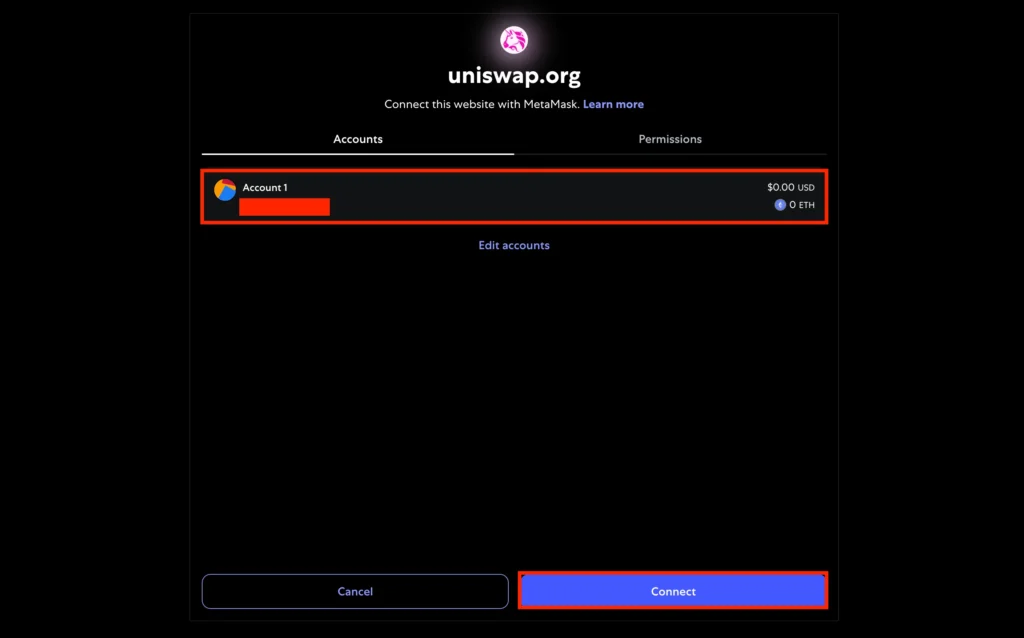
After clicking MetaMask, your browser will trigger a MetaMask window. Choose the wallet account you want to link. You can click “Create Account” right there if you don’t have one set up.
Click “Next,” then “Connect,” and MetaMask will ask you to approve access.
Remember that Uniswap doesn’t get control of your funds; instead, it just needs permission to interact with your wallet for swaps.
Once approved, the app will refresh, and you will be connected. You only need to connect your wallet once per session. After that, you’re ready to swap, send, and explore the decentralized side of crypto.
How to Swap Tokens on Uniswap
Swapping tokens on Uniswap is one of the simplest ways to trade crypto. Here’s precisely how it works:
Step 1. Head to the “Swap” Section and Choose Your Tokens
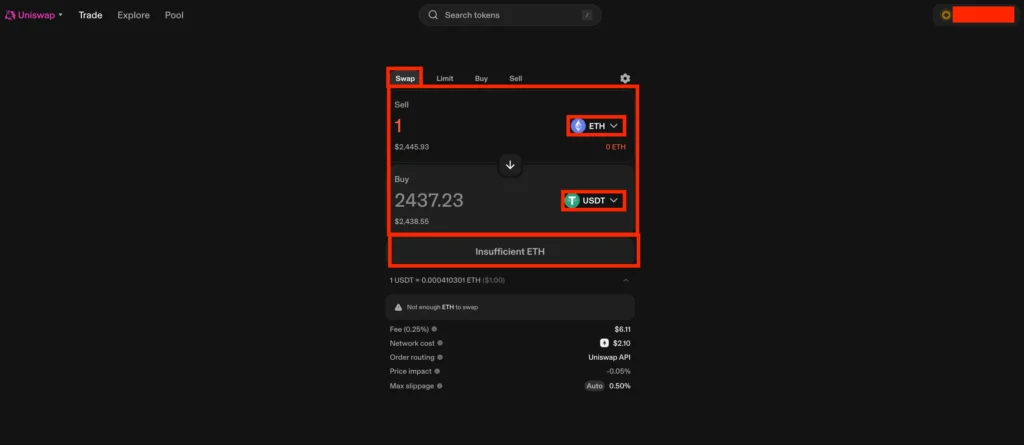
Once your wallet is connected to the Uniswap interface, you’ll land on the Swap tab by default (if not, just click it in the top menu).
From there:
- Select the token you want to trade (also called the “From” token)
- Enter the amount
- Choose the token you want to receive (“To” token)
You’ll see real-time estimates, including price impact, expected transaction fees, and minimum received after slippage.
Uniswap uses liquidity pools to power every swap. Liquidity providers fund these pools, and the more liquidity available, the smoother and cheaper the trade.
When you’re happy with the numbers, click “Swap.”
Step 2. Review the Details and Confirm the Swap
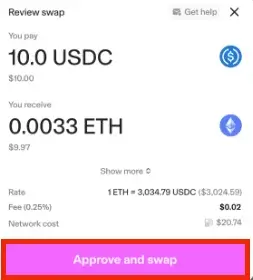
Before anything is finalized, you’ll get a full breakdown of the following:
- Tokens being swapped
- Exchange rate
- Estimated gas fees
- Slippage tolerance
- Route (in case your swap is routed through multiple pools)
Click “Confirm Swap.” Your wallet will then pop up and ask you to approve the transaction.
You’ll also need to approve first-time trades with a specific token for trading. That’s one-time permission, so Uniswap’s smart contracts can access it.
Once approved, sign the final message in your wallet, confirm the swap, and wait for the transaction to be mined on the Ethereum blockchain.
Once everything’s complete, you’ll receive a “Swap Successful” message. You can also view the transaction on Etherscan to track progress or verify details.
How to Send Crypto on Uniswap
Here’s how to send crypto through the Uniswap Protocol in just a few clicks:
Step 1. Open the “Send” Tab and Enter the Details
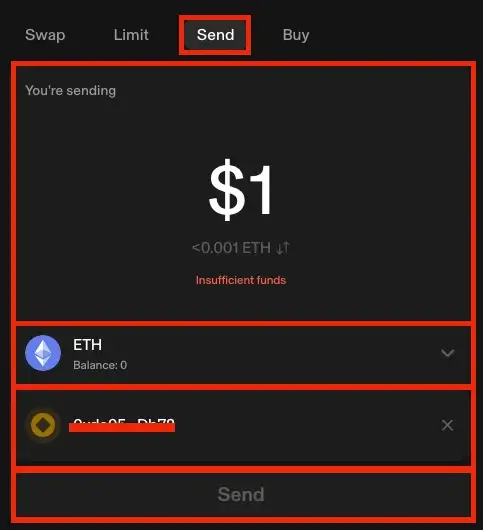
Once your wallet is connected to Uniswap, go to the Send tab in the interface (it’s right next to “Swap”).
From there, choose the token you want to send, enter the amount, and paste the recipient’s wallet address or ENS (Ethereum Name Service) name into the “To” field.
Ensure the recipient’s wallet is compatible with the Ethereum blockchain and supports the token you are sending. Sending to the wrong address type can result in a permanent loss of funds.
Double-check everything. There is no pressure, but transactions on Uniswap are irreversible — once they’re sent, they’re sent.
Click “Send” to continue.
Step 2. Review and Confirm the Transaction
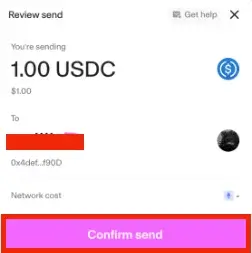
You’ll see a confirmation window showing the amount you’re sending, the token type, the destination address, and estimated transaction fees.
If it all looks good, click “Confirm Send.” Your wallet will prompt you to sign and approve the transaction.
Once confirmed, the transaction is submitted to the Ethereum blockchain, and a pending icon will appear on the top right of the Uniswap interface. You’ll get a notification once the transaction is finalized.
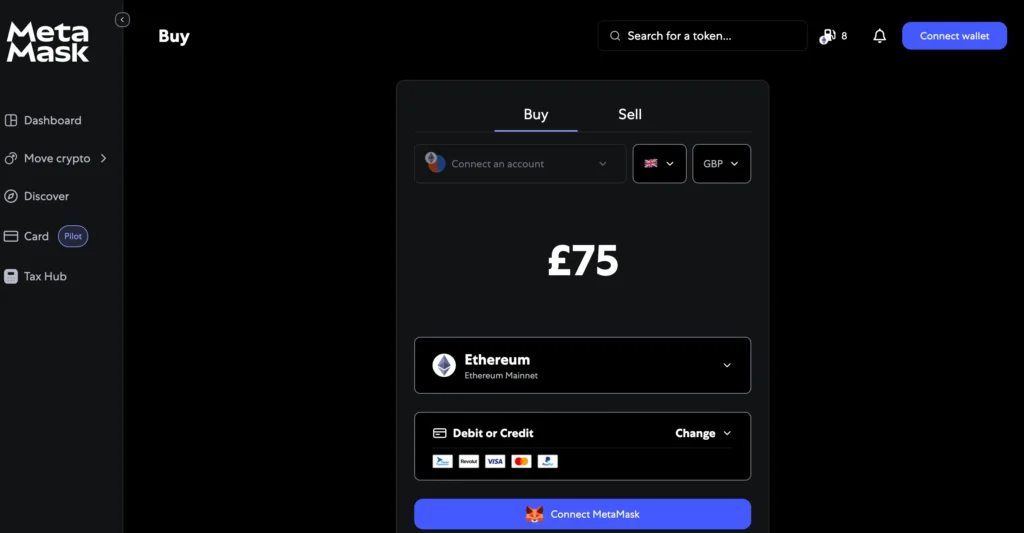
How to Buy Crypto for Uniswap
If your wallet‘s bone-dry, you must top it up before trading tokens or interacting with liquidity pools. Here’s exactly how to buy crypto directly through the Uniswap Protocol:
Step 1. Open the “Buy” Tab and Enter Your Purchase Info
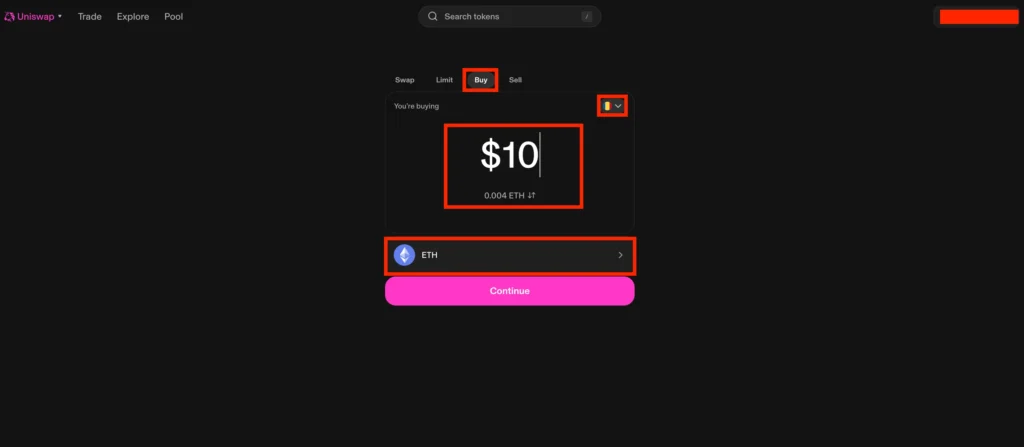
Once your wallet is connected, click the Buy tab at the top of the Uniswap interface.
Select your region, choose the crypto you want (usually ETH, but you can also buy other ERC-20 tokens), enter the amount you want to purchase, and then hit Continue.
Step 2. Choose a Provider and Finalize the Transaction
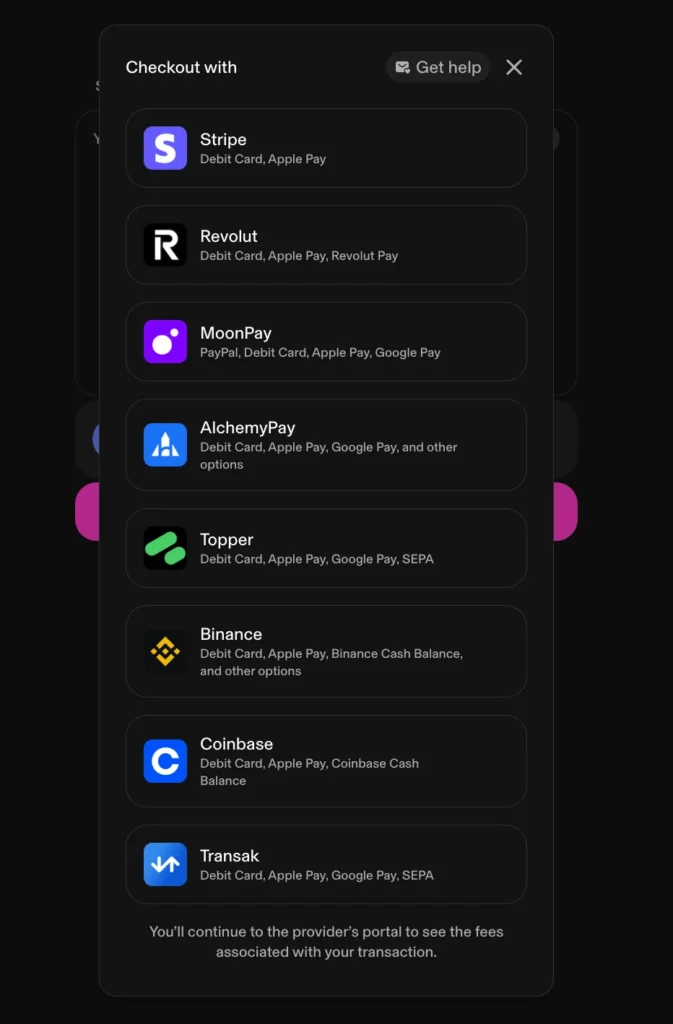
Uniswap will now display a list of available fiat on-ramp providers (the exact options depend on your location). These may include:
- Coinbase Pay;
- MoonPay;
- Revolut;
- Topper;
- Robinhood Connect;
- Stripe;
- Binance;
- Transak;
- AlchemyPay;
- Or other region-specific platforms.
Pick the one you like, and you’ll be redirected to their secure site to complete the transaction.
You might be asked to verify your email or phone number, upload an ID (yep, KYC is still a thing here), or confirm your payment method.
Once that’s done, your purchased crypto assets will be sent straight to your connected wallet.
Save on Fees with Layer 2 Networks
High gas fees are one of the biggest pain points for users on the Ethereum blockchain, especially during peak demand. That’s where Layer 2 networks come in. These scaling solutions (like Optimism and Arbitrum) allow you to swap, trade tokens, and interact with Uniswap while significantly cutting transaction fees, often down to a few cents.
Uniswap is already deployed on multiple Layer 2 chains, offering the same smart contract functionality as the mainnet but at a fraction of the cost. For anyone actively swapping or providing liquidity, this can add up to major savings over time. Lower costs also encourage more frequent transactions, which helps increase trading volume and grow the overall total value locked across the protocol.
Using Layer 2 doesn’t change the basics of how Uniswap works. You’ll still use your wallet, connect to the app, and swap or add to liquidity pools, but with faster confirmation times and cheaper fees.
Some governance token proposals (powered by UNI tokens) have even focused on incentivizing Layer 2 usage to improve efficiency and support growth. With lower friction, more users, and higher total value, Layer 2s are helping Uniswap scale without compromising on decentralization.
If you want to avoid paying $20+ per swap, switching to a supported Layer 2 network could be your smartest move. Ensure the tokens you’re trading are supported on that network, and you’re good to go.
Beginner Mistakes to Avoid When Using Uniswap
Now you know how to swap, buy, and send crypto using Uniswap. You’re set up with a wallet, understand how to connect it, and have seen how straightforward it is to trade tokens on a decentralized exchange. However, before delving too deeply, it’s wise to consider what not to do.
Although the Uniswap protocol is designed to make crypto trading easy, first-time users often encounter avoidable issues. Some mistakes cost time. Others cost actual funds. Here’s what to watch out for if you want to stay safe, keep your transaction fees low, and avoid unnecessary headaches.
1. Using Up All Your ETH and Forgetting Gas Fees
Every action on Uniswap (whether you’re making a swap, sending tokens, or interacting with a liquidity pool) requires a smart contract interaction. That means paying gas fees in ETH.
If you use up all your ETH during a trade, you won’t be able to approve or send any more transactions. No ETH means you’re stuck until you deposit more.
Always keep a small ETH balance in your wallet to cover network fees.
2. Swapping Into Scam Tokens
One of the most common beginner mistakes is trading into fake or malicious ERC-20 tokens. Since anyone can list a token on a DEX like Uniswap, scammers often create fake copies of real tokens to trick users.
Before you trade, double-check the token contract address on Etherscan or the project’s official site. A wrong move here can instantly wipe out your funds.
3. Not Adjusting Slippage Tolerance
Price swings and low liquidity can lead to slippage (the difference between the expected and actual execution price). If you don’t configure your slippage settings correctly, your transaction might fail or go through at a bad rate.
The default is often fine for popular tokens, but if you’re trading a token with lower trading volume or liquidity, adjust the tolerance manually.
4. Providing Liquidity Without Understanding the Risk
Becoming a liquidity provider in a Uniswap liquidity pool sounds appealing, especially since you earn a cut of transaction fees. But there’s more to it. Changes in price between the two assets in a pool can lead to impermanent loss.
If you provide to a pool with concentrated liquidity, ensure you understand how the protocol handles funds, fee tiers, and price ranges.
5. Trading When Gas Fees Are High
Gas fees vary based on network usage. If you trade during peak hours, your transaction fees can spike, and sometimes, your transactions can fail if the fee isn’t high enough.
Use a gas tracker or wallet estimator to find the cheapest times to trade. Sometimes, switching to Layer 2 solutions like Optimism can be significantly more affordable.
6. Connecting the Wrong Wallet or Network
Before trading, ensure you’re connected to the Ethereum blockchain (not a testnet or unsupported chain). Also, ensure your wallet supports ERC-20 tokens and is compatible with Uniswap.
Incorrect wallet setups are a common reason users can’t complete transactions or access funds.
Once you’re confident swapping tokens on Uniswap, the next logical step is learning how to earn yield from them. Our walkthrough on how to stake Cardano demonstrates how staking allows you to put your assets to work, without requiring liquidity pools.
FAQ
What is Uniswap?
Uniswap is a decentralized exchange (DEX) built on the Ethereum blockchain that lets users swap, buy, and trade ERC-20 tokens without a centralized intermediary. It runs on smart contracts and uses liquidity pools, where liquidity providers deposit funds so others can make trades. UNI governs the protocol, the native governance token, which allows holders to vote on upgrades and key decisions affecting the Uniswap protocol. Uniswap is non-custodial, meaning users always keep full control of their wallets and assets.
When Were UNI Tokens Launched, and What Are They Used For?
UNI tokens were launched in September 2020 to give the Uniswap community control over the protocol’s governance. Holders can vote on upgrades, fee structures, and how to allocate liquidity incentives. UNI plays a key role in how the Uniswap protocol evolves, especially as it competes with other market makers. UNI holders have also voted on proposals involving oracles, helping improve price accuracy for token swaps.
Do I Need ETH to Use Uniswap?
Yes. To use Uniswap on the Ethereum network, you need ETH to pay gas fees for each transaction. While you can trade tokens like USDC or DAI without holding ETH directly, your wallet must still have enough ETH to cover the transaction fees needed to interact with smart contracts.
What Are Uniswap Fees?
Uniswap charges a swap fee based on the selected liquidity pool tier. The fee structure is 0.01% for stable pairs (USDT/DAI), 0.05% for blue-chip pairs (ETH/USDC), 0.3% for most token swaps, and 1% for exotic or volatile pairs. These fees go to liquidity providers, not Uniswap itself. In addition to swap fees, you’ll also pay gas fees to complete transactions on the Ethereum network.
How Is Uniswap Different From Centralized Exchanges?
Uniswap doesn’t require signups, KYC, or custodial accounts. You keep control of your funds at all times through your crypto wallet. Trades happen directly on-chain using smart contracts, and anyone can access the platform, provide liquidity, or trade tokens without approval. The community drives the development of the protocol through the UNI governance token, making Uniswap a truly decentralized alternative to centralized exchanges.
What Are the Best Uniswap Alternatives?
Other DEX platforms worth exploring include PancakeSwap (on BNB Chain), SushiSwap (multi-chain, including Ethereum), 1inch Network (a DEX aggregator for better swap prices), and Curve Finance (focused on stablecoin liquidity pools). These platforms offer similar DeFi protocol features but vary in gas fees, supported chains, and token availability.
Final Thoughts
Now you know how to use Uniswap to swap, buy, and send crypto without relying on a centralized exchange. The current form of the protocol results from years of experimentation and feedback. By looking at past versions, you can see how Uniswap has improved its design and functionality.
The more information you gather and learn using the platform, the easier it becomes to avoid mistakes and take advantage of DeFi’s offers. Whether you’re here to trade or earn through liquidity pools, you’re better equipped to use Uniswap like an expert.